Hey, Craft Enthusiasts!
As we all know, having the right tools is crucial when building beautiful miniature rooms and 3D puzzles.
Rolife Recommended Tools for Beginners
By authors:
- Nicole Power (FB), the_elektric_crafter (Instagram)
Let’s talk Craft tools for Miniature making!
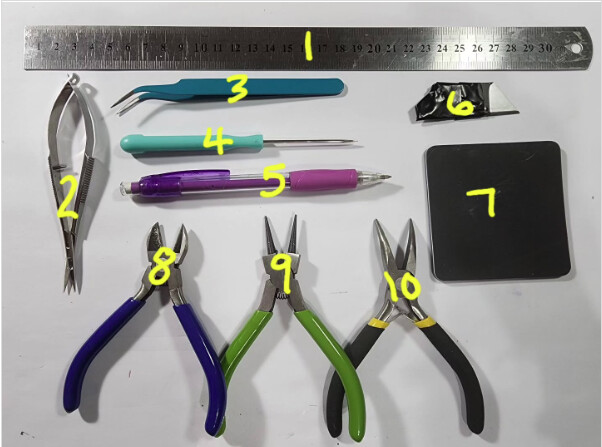
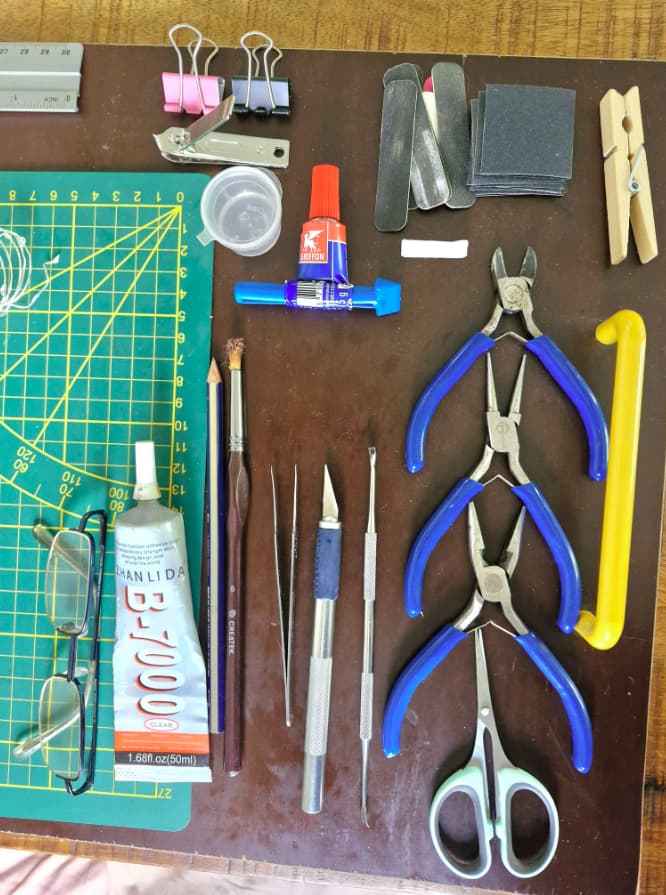
These are my basic main tools I use for building miniature houses and rooms.
- Steel ruler with in and cm measurements (and fabulous for straightening wire)
- Tweezer spring scissors. Made to allow for easy cutting for people with arthritis (and fantastic for intricate fussy cutting)
- Pointy bent tweezers (I also have a pair of precision very sharp pointed straight tweezers, perfect for finer detail positioning)
- Poky tool. Used to poke holes
 , to position items for gluing and to create twisted tendrils from florist wire.
 - Mechanical lead pencil.
- Blade. I use the blade like this as it is easier for me to use (please be extremely careful though as they are suuuuuper sharp and slippery!!)
- Small cutting mat. I don’t cut many things on this, hence why I only have a tiny one. (I have a larger A5 cutting mate for bigger projects)
- Metal Pincers. For precision cutting of metal wire.
- Round Nose Pliars. For creating round and bent additions in metal wire.
- Flat Nose Bent Pliars. Used to help position objects while gluing and to help with bending wire work.
What do you use in your basic tool kit?
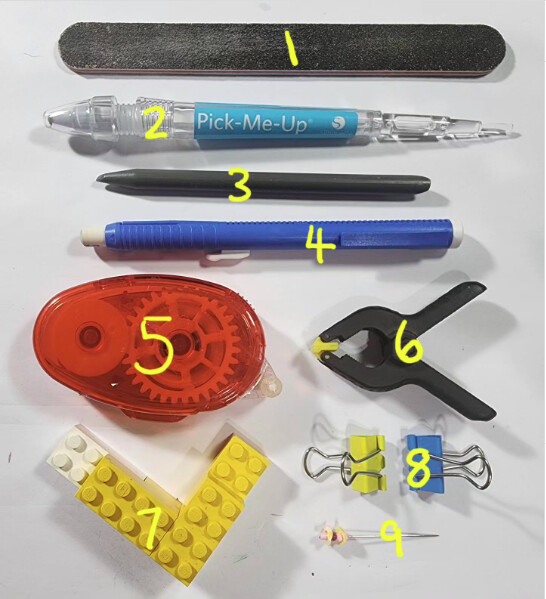
EXTRAS FOR THE TOOL KIT:
- Nail File. Used where sandpaper would normally be needed.
2.Pick-Me-Up tool. Basically a pen with blue tack on the end to help pick up teeny tiny bits that fingers just can’t seem to grab (this brand is the Silhouette Pick-me-up tool, but I’ve used a diamond art tool/putty before too) - Scoring Tool. Helps to create a crisp line for folding.
- Eraser. Probably one of the best ones I have ever used (Staedtler Mars 528 Plastic Stick Eraser)
- Tape Runner. I use both permanent and removable tape runners on pieces needing to be stuck and cut from mostly fabric to keep it in place
- Mini Clamps. Perfect for when those glued on bits just won’t stay still to dry.
- Mini Bull Clips. Used for the same purpose as the mini clamps and also to help with holding objects being painted
- Stainless Steel Pin. Stainless Steel as these normally do not rust inside the stem of the precision glue bottles (see in another post)
What else would you add that isn’t essential, but definitely handy?
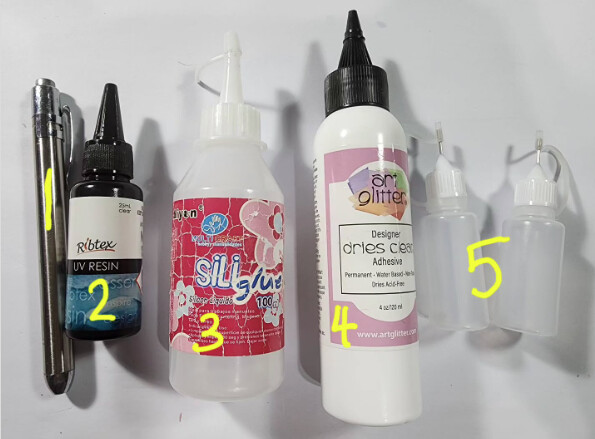
LET’S GET TACKY AND TALK GLUE!
These are my most used and absolute favourites I have found (being a scrapbooker for the past 17years,i have been through a lot of glue and glue brands!).
- UV Pen. This pen is used to set and cure UV Resin Glue
- Resin Glue. Used for very delicate gluing work or that pesky wire work some of us dread! Using resin glue and curing it with the abovementioned UV pen is a wire workers dream!
- SiliGlue. This glue is basically silicone glue. It is thick and dries clear and quite quickly. It is alcohol based glue and perfect for putting miniature furniture together. (I purchased this from ebay using a name search)
- Art Institute Glitter Glue. No, not glitter glue as such. More a PVA type glue. It is absolutely the best thing since sliced bread in my vrafty glue opinion. It is easy to use, dries fast and dries clear. Can be used on a variety of materials.
- Ultra Fine Glue Applicator Bottles. These are absolutely fabulous. Decant your glue from the main bottle into one of these babies and your glueing precision becomes perfect every time. I use a stainless steel pin to unblock the metal nib (see TOOLKIT EXTRAS post)
What is your favourite glue to use?
- Kari Nappi-Goldin (FB)
I have so many tools that have been game changers.
-3pc plier set (jewelry set)
-gorilla super glue and B7000
-wire shaping jig (doubles as a tight angle guide)
-stain markers
-bondic
-painting stand base w/holders
-acrylic paint pens
-wire harness tape
-heat shrink wrap
-different sized scissors
-mm ruler
-diamond art set lf tweezers.
-tacky putty (the stuff to hang posters with)
-a storage bin for all the extras from kits.
- Jerry Boswijk (FB)
I really love my set of different shapes and size tweezers. It helps holding little buts and getting into thight places.
ROKR Recommended Tools for Beginners
Next, we’ll share a guide to some of the best tools recommended by ROKR fans that are perfect for beginners. These tools will help make your production experience smoother and more precise.
By authors:
- Monique Van Eijk (FB)
Some of them..!
- Derrick-Alexys Jack (FB)
Fingernail Emory boards, a block of Parifin wax, some small files, some 400 sandpaper, painter’s tape, surgical Binoculars with light (best $50 you can spend), super glue, BSI insta-set accelerator, woodworking glue, scissors, “transparency clear plastic paper”, cutting board flat work surface. Pins that can be used as clamps when pushed into board.
- Theresa Daletto (FB)
I looked everywhere for something small enough for my hands, cheap and if I didn’t love the hobby it could still be helpful
- Steve Abbott (FB)
Desktop Letter rack for sorting/holding parts
- Jonathan Hartman (FB)
A black magic marker to run along the punched-out raw edges of black parts, an X-acto knife, which is sometimes necessary to sever the tiny laser-cut attachment points, thus freeing the parts from the sheet so they won’t break or delaminate/chip, plus a small pair of pliers, and a pair of curve-tipped tweezers for handling small parts. Also some ordinary white glue, which is actually quite important. Sometimes tabs will break when inserting them into their corresponding holes, and the interminable assembly of the stairs on the Seahorse can be difficult. A drop of white glue on the tab and in its corresponding hole or slot will lubricate the insertion process (as it were…![]() ), and the same thing applies to stair assembly. Gripped by the pliers or tweezers nearest the mating surfaces (thoughts out of the gutter, please…) the glue-lubricated parts will slip smoothly into place without breaking, and the white glue dries slowly enough so that everything can be aligned properly before final hardening. (ditto- I honestly couldn’t think of a more polite way to put all of this… apologies to those whom I have probably offended.
), and the same thing applies to stair assembly. Gripped by the pliers or tweezers nearest the mating surfaces (thoughts out of the gutter, please…) the glue-lubricated parts will slip smoothly into place without breaking, and the white glue dries slowly enough so that everything can be aligned properly before final hardening. (ditto- I honestly couldn’t think of a more polite way to put all of this… apologies to those whom I have probably offended. ![]() )
)
- Patti Moran (FB)
For me, I keep a neodymium magnet handy to attach to the shafts of my screwdrivers - it makes them much more magnetic and easy to pick up and control the screws. I also keep a tealight candle with my kit for waxing gears etc - easier to control than the small sticks they provide, and don’t break (though the smaller sticks get into tight spaces better, so don’t throw them away). An X-Acto knife is good for separating stubborn parts… also good for trimming bits that are too tight to fit in. A bottle of glue will come in handy. A full-sized nail file is easier to control than the little ones, but you may still need the little sheets of sandpaper for curved surfaces.
That’s all I can think of, but I’m sure others will mention anything I’ve missed.
- Nita Englemann Davis (FB)
My list is a LONG one, but these are all within reach when I am building. Needle-nose pliers, tweezers, razor knife, small hammer, a small ashtray to catch the tiny bits of wax that flake off (I do NOT use Vaseline). Old “tools” from previous kits to use as tiny sawhorses. (Dang near ANYTHING can be lightly tapped with a hammer when on a completely flat surface with support under where you are tapping). A paring knife works perfectly if you have to pull something apart. A pen to mark off each step as you go. Extra sandpaper and wax to sand/wax ANY and all tabs for pieces that can be easily broken. A tiny flathead screwdriver. A magnifying glass when needed. Last, but not least, my paints and brushes. In the event of an accident, super glue.
Hope this helps you all take your miniature building to the next level! What tools do you consider essential in your kit? Let’s share tips and learn from each other!